

If you want to know the latest thing that is causing a sensation in the world of crafts, we have it for you. We are talking about a set that is now being worn and that has caused a sensation among fans of things that can be made by yourself.
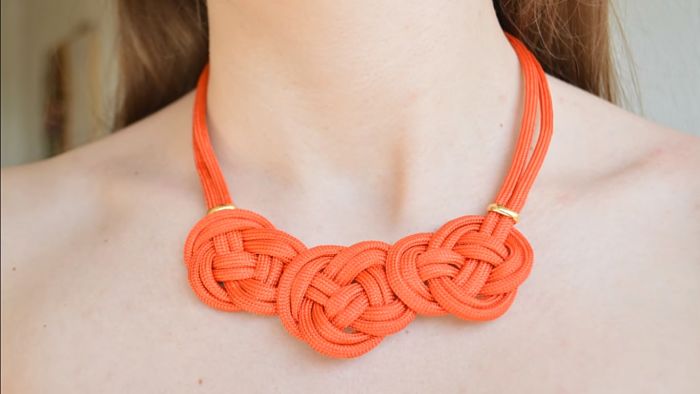
We are referring to the Celtic knot necklaces, which have been heard so much lately. The Celtic knot, as you surely already know, is a style of decoration that is made taking as reference the stylized knots, which used to be widely used in what was the island art of the Celtic people.
How to make necklaces with Celtic knots?
Its beautiful shapes are a powerful attraction to want to become one of them. Thinking about it, today we bring you a simple tutorial, where you will discover how easy it is to make it.
Materials you will need:
- A paracord cord that is relatively thick, bearing in mind that it will be doubly attached to your neck.
- One millimeter wire.
- Two rings.
- A carabiner.
Elaboration procedure:
- Cut eight feet of the paracord and fold it in half. You have to try to hold it with some pins on a cork or wood surface.
- Now you have to make a bow that is facing to the right in the following way, we take a cord and pass it down (always under it) it is important that you pay attention that it is below.
- Then you take them up and you have to pass it under that little bow that we made. Take a good look, below, it is very important. In our opinion, it is more comfortable if at this point, I pin the cord to the surface again.
- Now we lower it and see that it is above. Now look closely, we are going to pass it from the bottom up through the little hole that has formed there.
- We are going to let it cross over this middle and we are going to pass it under the other side of the knot that we are forming.
- When you have it, you can remove the tie pins because the knot will no longer unravel. What you have to do now is to tighten the knot a little. You are going to see now that when you press, that end that we have left to the left is going to get bigger so, when you start, try to do it very close to the other end.
- Very well, now we are going to do the second one and for this you have to do the same as before, that is, we are going to create the loop (remember that you have to pass it under itself).
- Now we are going to pass that cord under the bow. At this point, you know, we are going to clamp our work again, we lower it above the other, and as before from the bottom up through the little hole and below the one in the middle of the hole above.
- Remove your pins and we are going to tighten as before as best you can, always ensuring that the laces are even and that they do not mount one on top of the other so that later the knot is beautiful.
- The third knot is exactly the same, we make a loop passing it underneath, now we raise the cord under the bow, we lower it over the other, we pass it from bottom to top through the hole and under the cord that passes through in the middle of the loop above.
- We only have to tighten the cord and burn the end a little so that it does not fray.
- Now you have to put a ring on each side of the necklace. Then, cut 15 cm of wire and you have to roll it over some cylindrical object of 5 mm in diameter.
- Using the pliers, bend the wire up at a 90-degree angle and now bend it little by little with the round nose pliers to make a kind of handle.
- Cut off the excess and add a carabiner, put enough glue on the two cords and you can now put your terminal and of course, you have to do it on both sides. Let it dry and that’s it, you just have to choose with which model you are going to wear this beautiful necklace.


