

Bees have been in the media recently because of their declining population and the huge implication that their dwindling numbers are taking on food products. Because of this, reports have claimed that hives are now disappearing at an alarmingly rapid rate, which is largely due to pesticides and mites, as well as climate change.
Eating organic is very important, but unfortunately not many people get it and only some of the beekeepers produce organic honey.
The following is a famous homemade hive that someone very creative had as an idea and has become very popular on the web and, as it is very easy to do and can save bees, we recommend that you read the following text.
Homemade hive to save bees
As people recognize the seriousness of the problem, many go out of their way to help by maintaining their own hives, which is a surprisingly simple but very effective task to carry out.
Not only will it help decrease bee populations, it will also mean that you can produce your own organic honey for your personal consumption.
Raw organic honey is the perfect substitute to replace processed sugars and sweeteners to effectively protect you from all its dangerous health side effects.
Although extremely simple, you may lack the necessary tools to perform this simple hive modification. If that’s the case, be sure to visit your local hardware store for the tips and tools necessary to get the job done.
Or if you are very lucky and have a helpful friend who can tackle any project, give him a call.
Material you need for the hive
All you’ll need is a pre-made bottom from a hive kit, you can buy it made or you can make it yourself, plywood, and some jars for the main hive, along with:
- 1 2 “x 12” x 6 ‘piece of lumber (cut two pieces at 22 “each from the sides).
- 1 of 2 “x 12” x 6 ‘(cut two pieces at 18 “each from the front and back).
- 1 of 1 “x 1” x 6 ‘(cut two pieces at 22 “each along the left and right sides of the top frame).
- 1 “x 1” x 6 ‘1 (cut two pieces at 18 “each across the front and back of the top frame).
- 1 piece of thick plywood cut to 16 “x 20”.
- 12 large quart glass honeycomb jars.
- 1 box of 1 “wood screws.
- 1 can of any dark wood stain.
- and of course, your bees.
The plywood will act as a frame for the hive kit and can therefore be stained in any way you choose. 12 holes should be drilled in the 16 “x 20” piece of plywood which should be large enough to screw the glass jars.
After this, the top frame can be made by screwing the four pieces of 18 ″ and 22 ″ plywood, which can also be stained in any color.
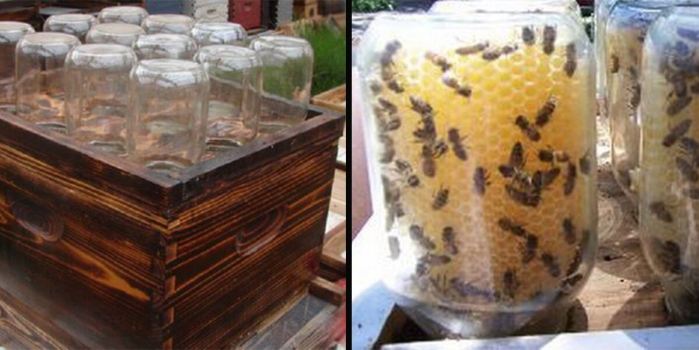
Now, sanitize each of the 12 jars before turning them upside down in the holes, before adding washers or wedges inside the jars to support the weight of the honey that will be there later. After the jar lids are screwed on, they should fit snugly into the drilled holes with a gap of less than 1/16 ″ between the jar and the hive hole.
After placing starter strips or empty combs inside the jars, you can now add your bees. They will immediately be drawn to the honeycomb and begin their work by making the honey. Once the jars are full of honey, you can twist the lids to keep the bees working while the honey is harvested.
You will notice that the jars heat up quickly when the lids are on, due to the lack of ventilation. Therefore, they must be kept in the shade.
Here are the 12 jars of hives arranged and installed in this hive. The jars sit with the screw cap for less than 1/16 ″ of space between the jar and the hive hole. You may need to add some weight-bearing shims so they don’t sag with the weight of the honey.
Once you have the basic supplies, the rest should be easy, providing you with a steady supply of delicious honey, while ultimately saving a rapidly declining population.


")

