

Building a house is not an easy task. Those who have been through it know very well all the efforts they went through to finally enjoy the desired peace and comfort within it. That said, today you are going to get some ideas to build something that is a little more accessible to do, that is, how to build a miniature stone house to decorate the garden.
You can make miniature houses out of river stones as raw material is becoming more and more popular for all kinds of small DIY projects. It is readily available and most importantly, it is free.
The other materials for this project, such as adhesives or pieces of wood or plastic for the roof, do not cost a fortune either, in fact, you can reuse them, and for this project you will not need a significant amount of them.
So just take a look at the selection of images below, choose your favorite miniature house and gather the necessary materials to start your project to decorate your garden today.
Miniature stone houses to decorate the garden.
An example to make a miniature stone house can be the following, just take note of what is required to, based on this, determine your own ideas to make your project according to your tastes.
This is a quick and easy way to get that little stone house doing it yourself.
You will need to:
- Glue.
- Ziplock bag.
- One way – bird house, butter container, plastic pot, pumpkin or another item.
- Some small stones.
- Tweezers.
- Shellac or urethane.
- All the decorative elements that you require in your project, artificial moss, natural plants, earth, etc.
Step 1 Get the stones.
If you live near a lake, river, or beach where you can get this kind of small, round, flattened stone, you have much of what you need on your side. If you don’t have access to this stone easily, you can buy it in bags at places that sell building materials.
Smaller packages of stones can sometimes be found at arts and crafts stores. Any stone will work if it is small and has a flat surface. You can stick it this way more easily to wood, glass and even pumpkin.
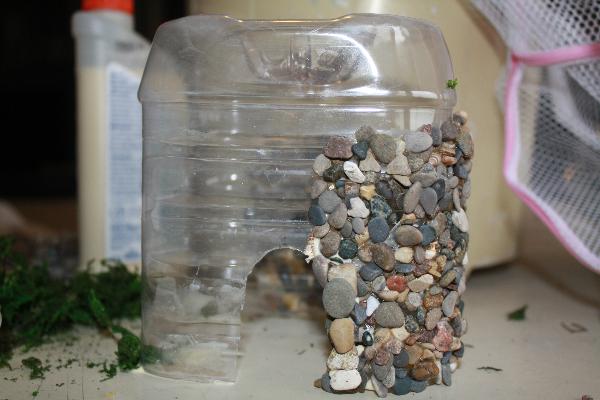
This time we will experiment with a plastic juice bottle and a plastic salad bowl.
The plastic pot that we will use is very useful to sift the smallest of stones and some of sand. Remove stones that are larger than 1/4 ”and set aside. Then put the rest in a mesh laundry bag and toss it outside the house.
This will get rid of most of the sand and the rest will disappear when you give the stones a rinse while they are still in the bag.
Step 2 make your stone tapestry.
First squeeze some wood glue into the Ziploc plastic bag and spread it out to make several small square areas up to 4 inches square. Next, take some stones and put them on the glue. Tweezers are useful for adding the smallest of stones to fill in the gaps.
Wait about half an hour and check your pictures. The glue will dry around the stones much faster than the glue on the plastic. Try to pick up the stone in the corner.
When it’s ready you will be able to lift the entire stone square, without separating the stones. The trick is that you need to lift the square while the glue is still tacky on the underside and the square is still flexible.
This allows you to apply in the rounded areas. If it dries completely, don’t worry. You will still be able to lift it from the plastic and you can add some glue to the back.
Step 3 Shape your stone house to decorate the garden.
Now you can apply the stone in any way you have chosen for your project. Cut out any desired windows or doors before applying the stone. You can remove individual stones if your square overlaps the cutout areas.
Wood glue works well for stone-by-stone gluing, as well as garden walls, archways, and anything else you can think of.
However, the finished project can be brittle, so add a couple of coats of varnish to help make it more stable and useful for the exterior.
Around doors and windows and on the ceiling of this project you can glue stones one by one according to the shape. On the ceiling you can see some “flowers”. Stone mosaics, if you have the patience, add a nice touch.
Finally, after varnishing, add a pinch of artificial moss here and there to give your project a more realistic look.


